Nowadays, Making Windows Bootable Especially Windows 7 And 8 Are Very Common. When You Buy A Computer, You Get Completely Absence Of OS!, You Need To Buy CD Or DVD Of Windows And Driver. So When In Case Of Corruption, You Can Install Again With No Enough Efforts. But Now Many People Are Doing This Way, Because Instead Of Making DVD-R They Make USB Bootable Because They Think That We Can Easily Remove Data After Installing. So, This Conception Is Not Bad. But If CDs And DVDs Are Finished, Then How Will People Firstly Install Windows?. If You Don't Have Any DVD Or CD To Install In Your Newly Buyed System, Then You Should Make Bootable Flash Drive On Another's Computer. But Remember You Should Have The ISO Of Your Windows. So, In This Tutorial, I Will Clear The Concept Of Making USB Bootable With Two Steps, With Software And With Command Prompt, You Have The Choice!. So Before Starting, You Should Read Requirements If Anyone Is Missed!.
Requirements
- USB Flash Drive : You've To Purchase A 100% Working USB, No Matter It Is Kingston Or Any Other, But It Should Be Atleast 4GB Because I Will Guide You To Make Windows 8.1 Pro Bootable Which Will Only Stored In 4GB. With XP, 1 GB Is Enough!.
- Windows ISO File : Just Download The Windows ISO File And Save It In Your Computer. It Is Format As ISO Because It Can Only Be Burned In DVD And USB Bootable.
- Windows 7 USB/DVD Download Tool : This Is A Software, Which Helps Your USB/DVD In Making Bootable. But In Case Of USB, This Uses The File "Bootsect.exe" To Paste In It's Directory To Make A Complete Backup Of USB. It Can Be Also Used For Windows 8 And 8.1, Not Lower Than 7!. Click Here To Download It!.
- Command Prompt : You'll Need A Command Prompt If You Are Willing To Make USB Bootable With Command Prompt. Take This, It Is So Simple And Interesting, But In Case Of Making USB From XP, It Will Take Your A Lot Of Time And Very High Attention!.
How To Make Bootable USB
1. Using Windows 7 USB/DVD Download Tool
Step 1 : Insert (Plugin) Your USB Flash Drive Into Your Computer's USB Port And Wait Until It Is Loaded.
Step 2 : Download The Software
Here And Install It.
Step 3 : Now Download The File "
bootsect.exe" From
Here.
Step 4 : First Install The Windows 7 USB/DVD Download Tool.
Step 5 : Now, Paste The Downloaded "bootsect.exe" To Your Windows 7 Tool Directory Here "C:\Users\yourusername\AppData\Local\Apps\Windows 7 USB DVD Download Tool".
Step 6 : Now, After This, Open The Software "Windows 7 USB/DVD Download Tool", It Will Look Like This:-
Step 7 : Click "Browse" Button, And Select Your Windows ISO File, Then Click On "Next".
Step 8 : Select Your Media Type, "USB Device".
Step 9 : After Selecting USB Device, Click "Begin Copying".
Now Wait A Little And You Will Get A Message That Your Backup Is Completed.
Step 10 : All Done!. Now Restart Your Computer And Install Windows In The Same Manner As You Install From DVD, But Select USB Flash Drive In Boot Option!.
2. Making USB Bootable Using Command Prompt
Warning!
When Attempting This Step You Should Very Caution, Otherwise You Would Be Starting From Beginning!.
2.1. Using Command Prompt On Windows XP
Step 1 : First Download
This File And Extract It Into A Folder.
Step 2 : This Folder Should Contain "cfadisk.inf" File, Open That With Notepad.
Step 3 : Find A Line Like This "%Microdrive_devdesc% = cfadisk_install,IDE\DiskIBM-DSCM-11000__________________________SC2IC801".
Step 4 : Let The File Opened, Go To "Device Manager", Expand "Disk Drives", Select Your USB And Click On "Properties".
Step 5 : Go To "Details" Tab, Under XP The Item "Device Instance ID" Is Already Selected, Below Is The Code, Just Press Ctrl + C.
Step 6 : Now Go To Notepad, See That Line Above, Paste The Code Replacing "IDE\DiskIBM-DSCM-11000__________________________SC2IC801".
Sample:-
%Microdrive_devdesc% = cfadisk_install,USBSTOR\DISK&VEN_LEXAR&PROD_JUMPDRIVE&REV_1.30
Step 7 : Don't Change Any Of The Line, Now Go To The Last Line Of The Notepad, There Will Be Written "Hitachi Microdrive" Which You've To Change To "RemovableToFixed".
Step 8 : Now After All The Accurate Result, Save The File, Then Come Back To "Device Manager", Select Your USB Drive, Click "Update Driver Software", Then Select 2nd Option Which Should Be That Install From Device (Advanced).
Step 9 : After Selecting, Click Next, Then "Don't Search I Will Install From A List Or...... ", Next -> "Have Disk", Now Browse That Saved "cfadisk.inf" File Here, Now "RemovableToFixed" Should Be In The List -> Next ->Confirm Warnings -> Finish.
Step 10 : Now The Main Step, Open "Command Prompt", But Remember To "Run As Administrator".
Step 11 : Now Enter "diskpart" There, Then Enter "list disk", See Your USB Flash Drive Size, If Your Size Matches Disk Number, Then Enter "select disk (your usb number without brackets)", Then Enter "clean", Then Enter "create partition primary", Now Enter "select partition 1", If select partition 1 doesn't Works, Then Do select partition (your usb number without brackets) Then Enter "active", Now Your USB Is Bootable!.
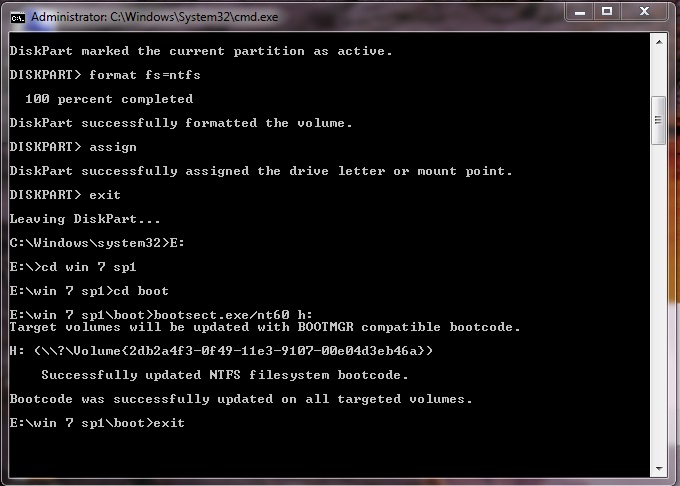
Step 12 : Don't Close Command Prompt, Enter "assign", Then Enter "exit", Now You Will Exit Diskpart Not Command Prompt, Don't Close Command Prompt.
Step 13 : Go To My Computer, Open Your USB Flash Drive, Format It With NTFS File Format.
Step 14 : Now Mount Your Windows ISO With Daemon Tools Or Any Other Software, Then Copy All The Windows Files And Paste To Your USB Flash Drive.
Step 15 : After Copying, Download "bootsect.exe" From Above Provided If You Have Not Downloaded.
Step 16 : Paste Your "bootsect.exe" To A Folder Name "W8" To Your Drive "D".
Step 17 : Come Back To Command Prompt, Enter "D:", Because You've Located Your File To Drive D.
Step 18 : Now Enter "cd W8", Because You've Located Your File To W8 Folder.
Step 19 : Now Enter "cd boot", If This Shows Error, Then Leave It.
Step 20 : Now Write "bootsect.exe/nt60 (your usb drive letter without brackets):" Example "bootsect.exe/nt60 h:", H Is The Letter Of The USB Flash Drive In My Computer.
Step 21 : Then You've Make Your Pen Drive Bootable!.
Step 22 : The Above Is Only The Example Because I've Pasted "bootsect.exe" File To That Above Directory, But You Should Follow My Rule Above.
Step 23 : That's All!.
Now You've Created Bootable USB Flash Drive Using This Method!.
2.2. Using Command Prompt On Windows Vista, 7, 8
In These Versions Of Windows, You Will Do All The Same Of The Above Methods, But You Will Skip From
Step 1 To
Step 9, Rest Of All Is The Same. This Is Because The USB Flash Drive Does Not List In "list disk" While Doing In Windows XP, That's Why I Told You To Do So.
Final Words!
Now Finally, You've Setup Your USB Flash Drive And Make Bootable In Order To Use It For Installation Of Windows. I Hope You Have Understand. I Have Provided Two Steps Because If The First One Not Works, Then You Should Try Second, This Is The Only Step That Works 100% Because I Have Also Installed Windows 8.1 Pro From Second Step. Remember, That While Attempting Second Step, You Should Be Very Very Caution. Enjoy The Windows 8.1 Pro!. If You've Any Question, Ask In Comments!.


